Cut a healthy stem just below a node. Put that lower node in water and keep the leaves out. Refresh the water once or twice a week, sooner if cloudy. When roots are about 1 inch long, move the cutting into a small draining pot of fresh potting mix.
Rooting and transfer guidance: Iowa State Extension.
A jar first. A small pot later.
Start with three cuttings
A healthy golden pothos vine, clean sharp scissors, and a clean jar. Three is our small-project choice; one cutting also works.
Pot them when rooted
A 4-inch-wide pot with drainage holes, a saucer, and fresh indoor potting mix. Use a smaller pot for one tiny cutting, or a larger one only if the roots need it.
Skip plant food for now
No fertilizer goes into this rooting jar. Wait until the cuttings are established in mix before starting the feeding plan.
Why a small pot: Illinois Extension. Fertilizer starts after establishment: Iowa State Extension.
Keep pothos and loose cuttings away from pets and children who may chew them. Its sap can irritate skin; wear gloves if needed and wash your hands afterward. Pothos safety and care.
01 / MAKE THE CUTTING
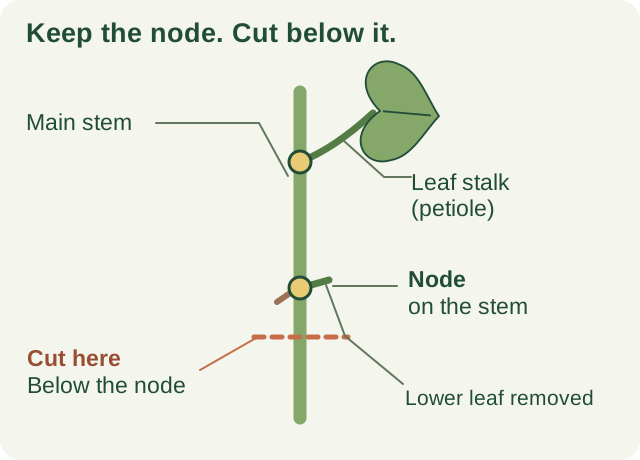
Find the node on the main stem.
A node is the joint where a leaf stalk meets the vine. A little aerial-root bump may sit beside it. A detached leaf and its stalk alone are not the stem-and-node cutting used here. UF/IFAS describes the stem, node, and attached leaf.
- 1
Choose a healthy piece.
Look for a 3–6-inch stem with at least two nodes. Avoid pests, soft stems, and damaged growth. Spring and summer are convenient times while the parent plant is growing.
- 2
Cut just below its lowest node.
Keep that node attached to the upper piece you are taking. Remove the lower leaves; leave the upper leaves in place. Do not cut through the node.
Cutting selection: Illinois Extension. Tool hygiene and trimming near a node: Illinois Extension’s propagation guide.
02 / GROW ROOTS
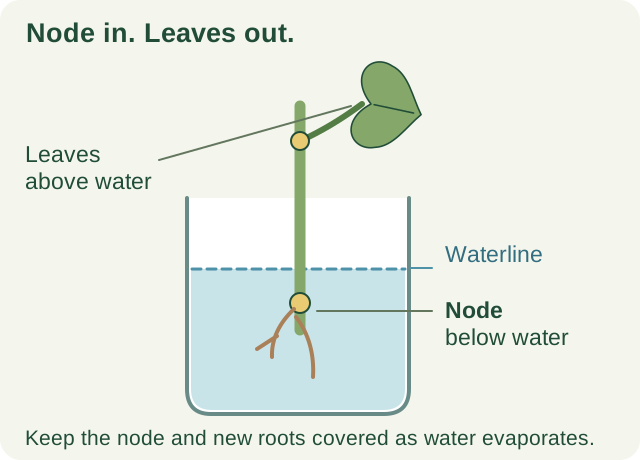
Keep the node below water.
Stand the cutting upright in the jar. Fill until the lower node is submerged, with every remaining leaf above the water. Leave it in a warm, bright place away from direct sun.
Check the level
Top up before the node or growing roots are exposed. Replace the water once or twice a week, and sooner if it turns cloudy.
Watch the roots
Pothos may root in about 3–4 weeks in warm conditions. Your jar can take longer. Root growth decides the next step, not a calendar deadline.
Water routine: Iowa State Extension; cloudy water: Illinois Extension; pothos timing: UW–Madison Extension.
03 / MOVE INTO MIX
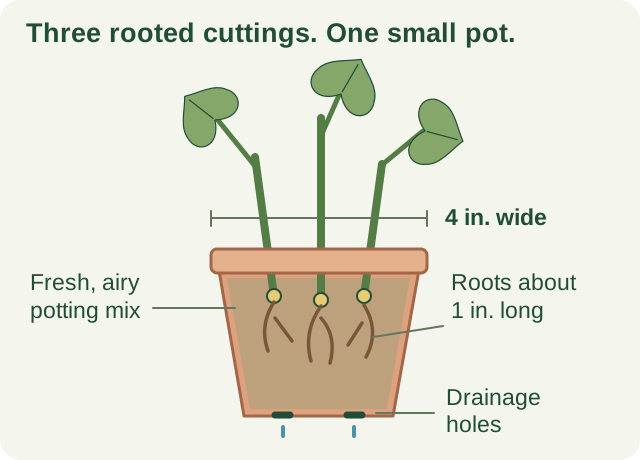
Pot up at about 1 inch of roots.
Wait for roots, not just the old aerial-root bump. When the new roots are about 1 inch long, prepare your pot. You do not need to grow a long tangle in the jar first. Illinois Extension’s transfer guidance.
- 1
Make room for the roots.
Use fresh, airy indoor potting mix, not garden soil. Dampen it first. Make a hole for each cutting so the roots can sit without being forced into place.
- 2
Cover roots, keep leaves above mix.
Set the lower rooted node into the mix, fill gently around it, and keep the leaves clear. Water slowly until excess drains, then empty the saucer.
- 3
Help the roots adjust.
Keep it in bright, indirect light. Check the mix often: water as the surface starts to dry, without letting the small root zone dry hard or stay waterlogged. Water-grown roots can wilt while adjusting to mix.
Mix and drainage: University of Maryland Extension. Keep leaves above the rooting medium: Illinois Extension. Adjustment after water rooting: Iowa State Extension.
For the ongoing watering routine and a named US fertilizer with its dilution, use the complete pothos care plan. Need help choosing the pot? See drainage holes and saucers.
If something looks wrong.
No roots yet?
First check that your cutting includes a main-stem node and that it stays in water. Keep the jar bright but out of direct sun. A healthy stem can need more time, especially in a cooler room. Adding fertilizer is not the next step.
Cloudy water or a soft, failing cutting?
Remove any submerged leaves, clean the jar, and replace the water. Discard a soft, decaying cutting and restart with healthy material. Do not put it back among sound cuttings. Cleanliness and water care.
Leaves droop after potting?
Check the mix before watering again. Water-rooted cuttings can wilt during the change to soil; a damp pot does not need another soaking. Keep care steady and bright light indirect. Water-rooted cuttings and transplant stress.
Can I root pothos directly in mix?
Yes. Use a small draining container of moist, airy rooting medium such as perlite or a seed-starting mix. Insert a lower node, keep leaves above the medium, and provide bright indirect light and humidity. Keep the medium moist without saturation. This skips the water-to-mix transition. Stem-cutting method and rooting media and moisture.
BEHIND THIS GUIDE
Sources you can check.
This is a practical synthesis of Extension guidance. The three-cutting, 4-inch-pot arrangement and the diagrams are our editorial examples, not results from a Plant Care Steps growing trial. Match the pot to the roots you have.
- Iowa State Extension: water changes, root length and aftercare
- Illinois Extension: stem cuttings and direct rooting
- UW–Madison Extension: pothos care and propagation
- UF/IFAS Extension: pothos stem-and-node propagation (PDF)
- Illinois Extension: clean tools and cloudy rooting water
- University of Maryland Extension: potting mix and drainage
- Illinois Extension: small pots for houseplant cuttings
Compiled with AI assistance; independent horticultural review is still pending. Read our editorial approach.